Master the Lebanese Classic: Step-by-Step Kibbeh Recipe
There are dishes that simply nourish the body, and then there are those that feed the soul. Lebanese Kibbeh unequivocally belongs to the latter. More than just a meal, it's a culinary masterpiece, a true labor of love, and a testament to the rich gastronomic heritage of the Middle East. For many, the mere mention of kibbeh recipe evokes memories of family gatherings, the comforting aromas of spices, and the rhythmic motions of skilled hands preparing batches for celebratory feasts.
I still recall the captivating sight of my own family members, their hands moving with practiced grace, blending fine bulgur wheat with seasoned ground meat and fragrant herbs, then meticulously shaping each delicate shell. These shells would then be lovingly filled with a savory mixture of onions, more spiced meat, and toasted pine nuts, before being transformed into golden, crispy bites. The process demands patience, precision, and a touch of artistry, making every perfectly crafted piece a true indulgence.
Often considered the national dish of Lebanon, Kibbeh is an essential component of any authentic mezze spread. Imagine pairing its rich flavors with creamy hummus, the smoky tang of moutabal, the vibrant freshness of tabbouleh, or the fiery kick of muhammara, all scooped up with warm pita bread. It's an experience that tantalizes every taste bud and transports you straight to the heart of Lebanese dining.
For years, the perceived complexity of making Kibbeh at home might have seemed daunting. But fear not! This comprehensive, step-by-step guide is designed to empower you to master this timeless dish. Whether you're an experienced home cook or venturing into the world of Lebanese cuisine for the very first time, these detailed instructions and expert tips will help you create golden, crispy, and utterly flavor-packed Kibbeh that will impress everyone at your table. Get ready to embark on a delightful culinary journey and perhaps even start your own family tradition with this cherished kibbeh recipe.
Essential Ingredients for Your Kibbeh Recipe
Crafting the perfect Kibbeh begins with understanding the role each ingredient plays. Here’s a closer look at what you’ll need to create those signature crispy shells and the succulent, flavorful stuffing.
For the Kibbeh Shell:
- Bulgur Wheat (#1 Fine): This is the backbone of your Kibbeh shell. Using #1 fine bulgur is crucial for achieving the desired smooth, uniform texture. It’s imperative to wash and drain the bulgur thoroughly but avoid soaking it for extended periods. The goal is for it to hydrate just enough to soften, while still retaining some firmness. Patting it dry ensures the right consistency and prevents a soggy shell.
- Lean Ground Beef: The shell requires lean ground beef to provide a rich, meaty foundation without excess fat that could make the mixture greasy or difficult to shape. The quality of your meat significantly impacts the overall flavor and texture.
- Onion: Finely grated or pureed onion adds moisture and a sweet, pungent flavor to the shell, helping to bind the mixture and enhance its aroma.
- Fresh Herbs: A combination of dried mint and fresh or dried marjoram is vital. These herbs infuse the shell with distinctive aromatic complexity and the authentic Middle Eastern taste profile that defines Kibbeh.
- Spices: A classic blend of salt, black pepper, and cinnamon adds warmth and depth to the shell. Some traditional recipes also include a hint of allspice for an even richer, earthy note.
- Ice-Cold Water: This might seem unusual, but adding ice-cold water gradually is key to achieving the proper consistency and binding of the Kibbeh dough. It helps emulsify the mixture and create a pliable, firm shell that holds its shape during cooking.
For the Delicious Stuffing:
- Ground Lamb or Beef: For the stuffing, a slightly fattier ground meat (lamb is traditional and highly recommended for its rich flavor) works beautifully. It provides succulence and flavor to the interior.
- Ghee or Olive Oil: Used for sautéing the stuffing ingredients, imparting a rich flavor and ensuring a tender texture. Ghee adds a traditional, buttery depth.
- Onion: Finely chopped onion is sautéed until golden, forming the aromatic base of the stuffing.
- Spices: A similar blend of salt, black pepper, and cinnamon, perhaps with a touch more allspice, seasons the stuffing to perfection.
- Toasted Pine Nuts: These add a delightful crunch and a nutty, buttery flavor that complements the savory meat beautifully. Toast them lightly before adding for maximum impact.
- Pomegranate Molasses: This is the secret ingredient that truly elevates the stuffing. Its unique sweet, tart, and tangy profile adds an essential depth and complexity, balancing the richness of the meat and creating an unforgettable flavor experience.
- Lemon Juice: A squeeze of fresh lemon juice brightens the stuffing and enhances the tanginess, working in harmony with the pomegranate molasses.
Step-by-Step Guide to Crafting Perfect Kibbeh
Step 1: Preparing the Bulgur and Shell Mixture
- Wash and Hydrate the Bulgur: Place the #1 fine bulgur in a fine-mesh sieve and rinse thoroughly under cold running water until the water runs clear. Gently squeeze out any excess water. Transfer the bulgur to a large bowl and let it sit for about 15-20 minutes to soften slightly. It should be moist but not waterlogged. You want it to swell without becoming mushy.
- Prepare the Shell Ingredients: In a food processor, combine the lean ground beef, finely grated or pureed onion, dried mint, marjoram, salt, cinnamon, and black pepper. Add the hydrated bulgur to this mixture.
- Process the Shell Dough: Process the mixture in batches until it forms a very fine, paste-like consistency, almost like a dough. This might take several minutes, stopping to scrape down the sides.
- Add Ice Water Gradually: With the food processor running (or while kneading by hand), slowly add ice-cold water, a tablespoon at a time, until the mixture comes together into a smooth, pliable dough that can be easily shaped without cracking. The amount of water can vary, so add cautiously. The final dough should be firm enough to hold its shape but soft enough to work with.
- Knead and Chill: Transfer the dough to a bowl, cover it, and refrigerate for at least 30 minutes. This helps the flavors meld and the dough to firm up, making it easier to handle.
Step 2: Preparing the Savory Stuffing
- Toast Pine Nuts: In a dry skillet over medium heat, toast the pine nuts until golden and fragrant. Remove immediately to prevent burning.
- Sauté Onions: In a separate pan, heat the ghee or olive oil over medium heat. Add the chopped onion and sauté until softened and translucent, about 5-7 minutes.
- Cook the Meat: Add the ground lamb or beef to the pan with the onions. Break it up with a spoon and cook until browned, ensuring there are no pink bits left. Drain any excess fat.
- Season the Stuffing: Stir in the salt, black pepper, cinnamon, and allspice. Cook for another minute until fragrant.
- Add Finishing Touches: Remove from heat. Stir in the toasted pine nuts, pomegranate molasses, and fresh lemon juice. Mix well and set aside to cool completely. It's important that the stuffing is cool before you use it, as warm stuffing can make the shell difficult to shape.
Step 3: Shaping and Stuffing the Kibbeh
- Prepare Your Workspace: Have a bowl of ice water nearby to moisten your hands as you work. This prevents the dough from sticking.
- Form the Shells: Take a small amount of the kibbeh dough (about the size of a golf ball or a little larger, depending on desired size). Roll it into a smooth ball between your palms.
- Create the Cavity: Using your index finger, carefully make a hole in the center of the ball, rotating it gently to create a hollow cavity. The key is to create a thin, even shell without any holes or cracks. Continue to thin out the walls as you rotate, making sure the opening remains wide enough for stuffing. This step requires a delicate touch and practice.
- Fill the Shells: Spoon a generous amount of the cooled stuffing into the hollow shell, leaving a small space at the top.
- Seal the Kibbeh: Carefully pinch and bring the edges of the shell together to seal the opening. Smooth out any seams or cracks, shaping the Kibbeh into its traditional torpedo or oval shape. Place the finished Kibbeh on a baking sheet lined with parchment paper. Repeat with the remaining dough and stuffing.
Step 4: Cooking Your Masterpiece
You have two primary options for cooking your beautiful Kibbeh:
- Deep-Frying (Traditional & Crispy): Heat a generous amount of neutral oil (like vegetable or canola oil) in a deep pot or Dutch oven to 350-375°F (175-190°C). Fry the Kibbeh in batches, ensuring not to overcrowd the pan, until they are golden brown and crispy on all sides. This usually takes 5-7 minutes per batch. Use a slotted spoon to transfer them to a wire rack lined with paper towels to drain excess oil. This method yields the most authentic crispy exterior.
- Baking (Lighter Option): Preheat your oven to 400°F (200°C). Lightly brush the shaped Kibbeh with olive oil or spray with cooking spray. Arrange them on a baking sheet and bake for 25-35 minutes, or until golden brown and cooked through, turning halfway for even browning. While not as crispy as fried, baked Kibbeh is a delicious and lighter alternative.
Tips for Perfecting Your Kibbeh Recipe
Making Kibbeh is an art that improves with practice. Here are some invaluable tips to ensure your first (and subsequent) batches are a resounding success:
- Maintain Moisture for Shaping: Keep your hands moist with ice water while shaping the shells. This prevents the dough from sticking and helps create a smooth surface.
- Don't Over-Soak Bulgur: The key is rehydration, not saturation. Over-soaked bulgur will result in a mushy shell that falls apart easily. Pat it dry thoroughly after rinsing.
- Lean Meat is Key for Shells: Excess fat in the shell mixture can make it greasy and difficult to bind, leading to cracking during shaping or frying.
- Chill Your Dough and Stuffing: Chilling the kibbeh dough makes it firmer and easier to handle, preventing it from becoming sticky. Similarly, a cooled stuffing is less likely to seep through thin shells or cause them to burst.
- Practice Makes Perfect: The shaping process can be tricky initially. Don't get discouraged if your first few aren't perfect. You'll develop a feel for the dough quickly. For more in-depth advice on achieving that perfect crispy shell and deeply flavorful stuffing, explore our article on Authentic Lebanese Kibbeh: Secrets to Crispy Shells & Flavorful Stuffing.
- Fry in Batches: Overcrowding the frying pan will lower the oil temperature, leading to greasy Kibbeh instead of crispy ones. Fry in small batches to maintain optimal temperature.
- Freezing for Future Cravings: Kibbeh freezes beautifully! Once shaped, arrange them in a single layer on a baking sheet and freeze until solid. Transfer to freezer-safe bags or containers. When ready to cook, you can fry or bake them directly from frozen, adding a few extra minutes to the cooking time. This is a common practice in Lebanese households, ensuring a delicious meal is always within reach.
- Stuffing Consistency: Ensure your stuffing isn't too wet, as this can make the shell soggy or prone to bursting.
- Beginner's Best Friend: If you're new to this culinary adventure, our guide Your First Perfect Kibbeh: Essential Tips for the Lebanese Delight offers even more foundational advice and troubleshooting for a smooth start.
Serving Suggestions for Your Homemade Kibbeh
Once your golden, crispy Kibbeh are ready, the real fun begins! They are incredibly versatile and can be enjoyed in many ways:
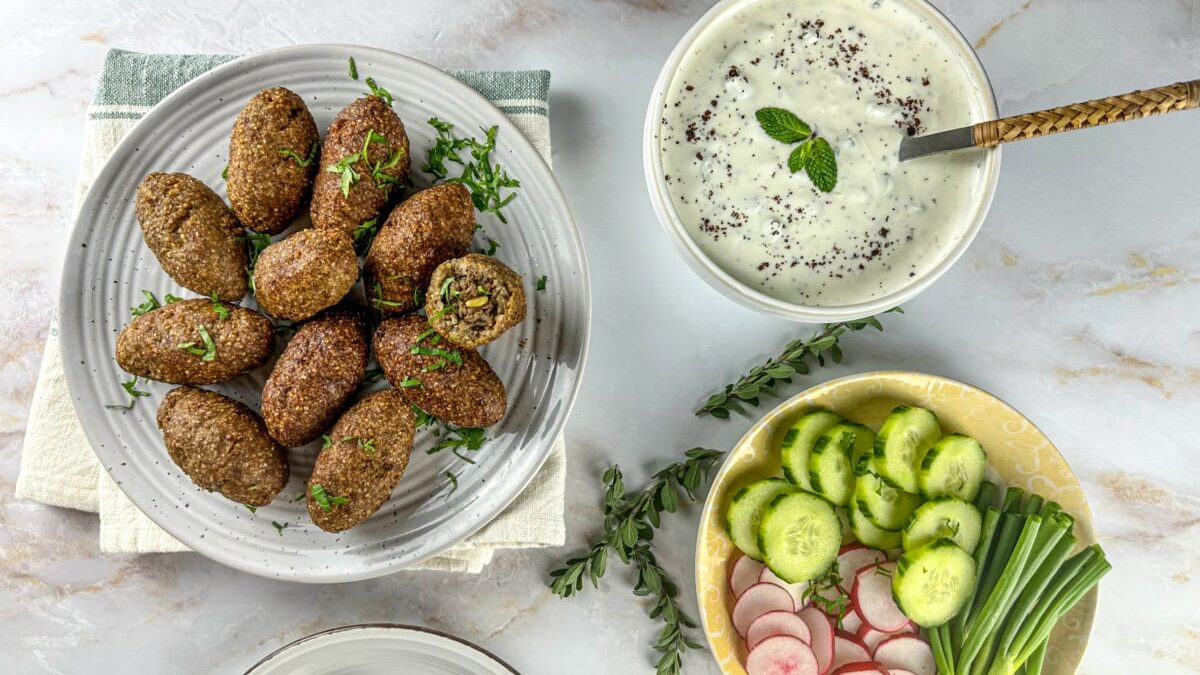
- Mezze Platter Star: Serve them as the centerpiece of a traditional Lebanese mezze spread alongside creamy hummus, baba ghanoush (moutabal), a refreshing tabbouleh salad, crisp pickled vegetables, and warm pita bread.
- With Yogurt Sauce: A simple, cool yogurt sauce infused with garlic and mint makes a fantastic dipping companion, cutting through the richness of the fried meat.
- Lemon Wedges: A squeeze of fresh lemon juice just before eating brightens the flavors and adds a zesty kick.
- Light Meal: Enjoy them as a satisfying light lunch or dinner with a side salad.
Mastering this traditional kibbeh recipe is a rewarding culinary journey that connects you to generations of Lebanese cooking. While it requires a bit of patience and practice, the result — a platter of golden, flavorful, and soul-satisfying Kibbeh — is undoubtedly worth every moment. So roll up your sleeves, gather your ingredients, and prepare to delight your senses with this authentic taste of the Middle East. You might just find yourself proudly sharing photos of your own delicious creations!
